Dynamic IP Addressing (DHCP)
Windows 7/8.1/10
Configuring a Dynamic IP Address Windows 7/8.1/10
Note: This help sheet applies only to machines that will use a dynamic IP address (e.g., if you are using a laptop on the main campus, machines in residence halls, Mines Park, Greek houses, and most of the main campus). If you are connecting using a static IP address then you need to instead consult the Windows 7/8.1/10 Static TCP/IP connection instruction sheet.
This help sheet has been developed for students living in Mines Residences and faculty/staff members on the main campus who wish to set up a network connection on their PC running Windows 7/8.1/10. It assumes your computer already has a NIC (Network Interface Card) installed. This help sheet describes the basic steps necessary to establish communication between your PC and the Internet using TCP/IP (Transmission Control Protocol/Internet Protocol). You will not need many of the network options and settings available to you through Windows 7/8.1/10. As a general rule, unless specific instructions are included in this document, Windows 7/8.1/10 default settings are fine. Below are screenshots that follow the steps provided.
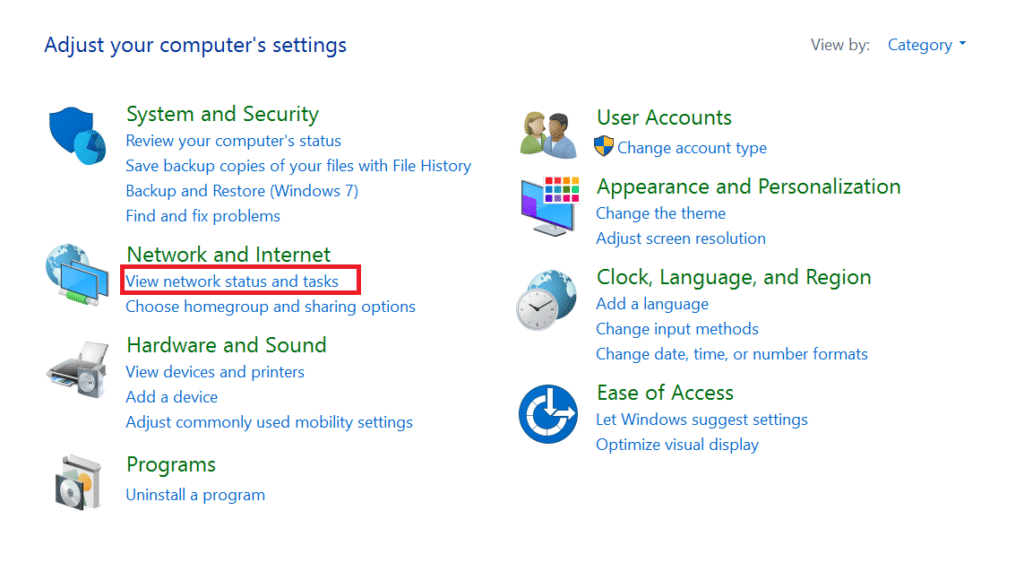
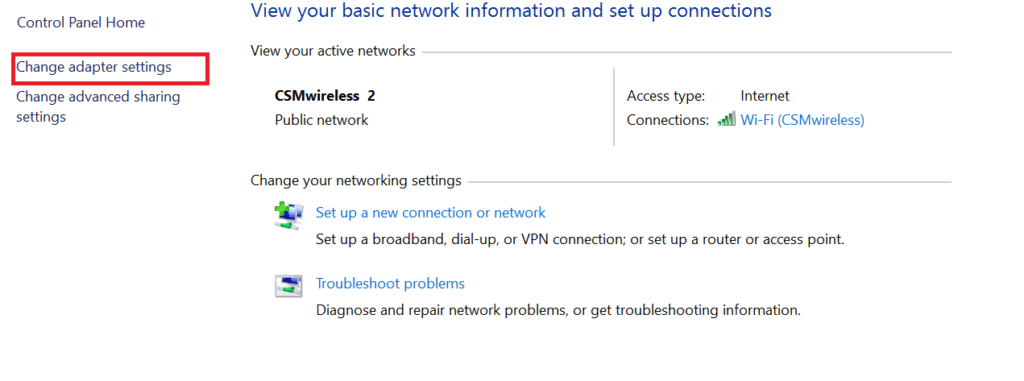
- From the Start button in Windows 7 and 10 or the search menu in Windows 8.1 complete the following steps: type in “Control Panel” and hit enter. –> select “Network and Sharing Center” –> select “Change adapter settings”.
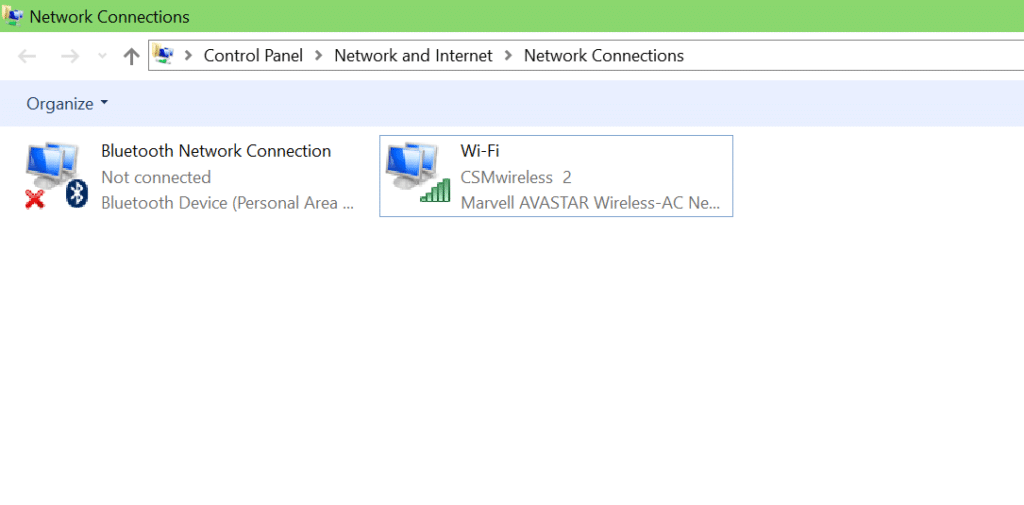
- Select “Local Area Connection” then Right click and choose “Properties” from.
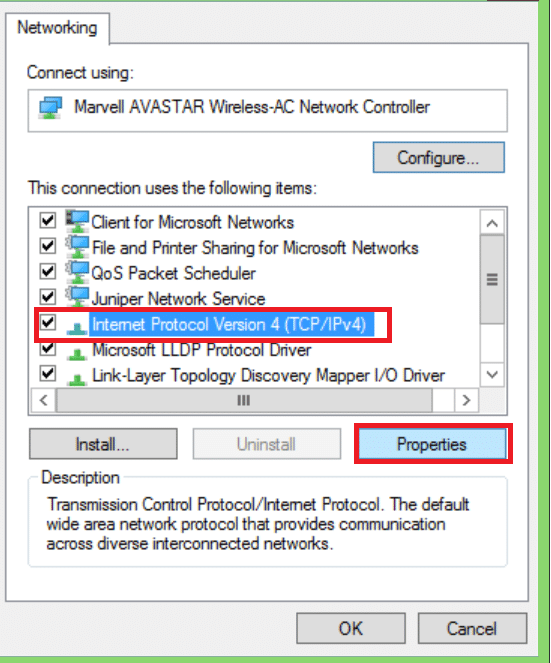
- Select “Internet Protocol Version 4 (TCP/IPv4), be sure it’s checkbox is check marked.
- Click the Properties button.
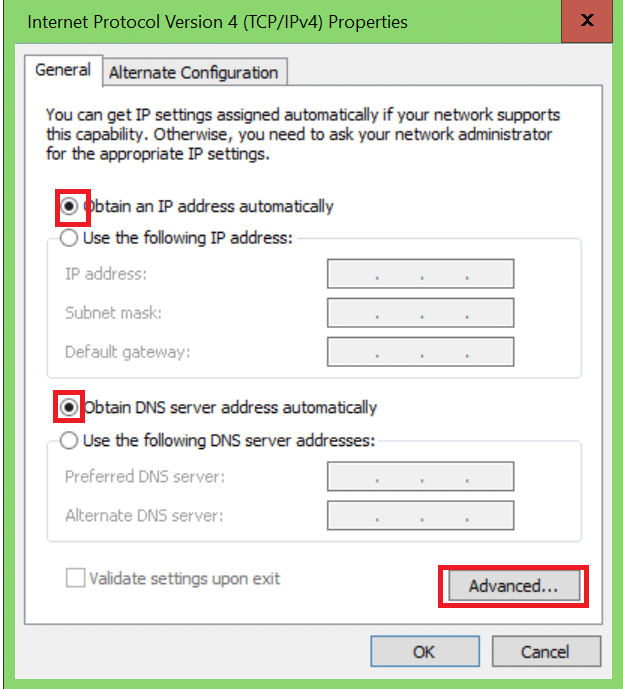
- Select option “Obtain an IP address automatically” if it is not already selected.
- Select option “Obtain DNS server address automatically” if it is not already selected.
- Click the Advanced button.
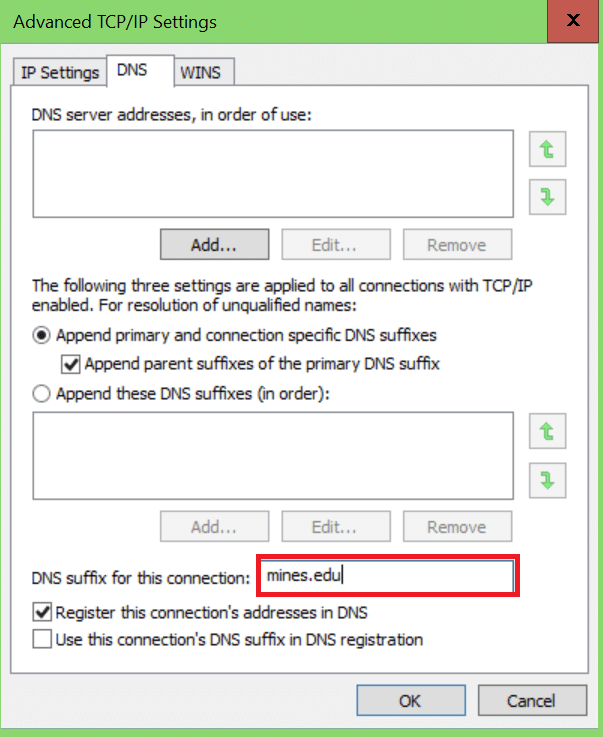
- Select the DNS tab.
- In the “DNS suffix for this connection:” field enter “mines.edu” (not the quote marks), then Click Ok.
- Click Ok again, then Click Close.
Having completed all of the above steps, you should now be able to utilize software that requires a TCP/IP connection (e.g., telnet, ftp, web browsers, etc.)
Troubleshooting
If you have followed the instructions above and still cannot connect to the Mines network, try the following before seeking additional help:
- Ensure that your network cable is plugged in to your machine and the correct jack on the wall. Double check the port number with the one you requested to have activated
- Most network cards will default to automatically detect the network speed. Sometimes, this doesn’t work, and you need to manually set the speed. In the “Local Area Connection Properties” window, Click the “Configure” button. Under the “Advanced” tab, you can change your NIC settings. Scroll down to and select “Speed and Duplex”, then manually set the speed to “100Mbps Full Duplex” in the drop down menu on the right. 100Mbps Full Duplex will work almost everywhere on campus. If that doesn’t solve the problem, change the speed to “10Mbps Half Duplex”. 10MbpsHalf will work everywhere on campus.
- Return to where you selected the “Local Area Connection”. Here to reset the adapter you may right click and select “Disable” then right click again after a few second to “Enable” the device again. If the device was aleady disable please re-enable it.
- Some setting changes require a restart. Please restart your machine to see if this resets the adapter.
- If these steps do not resolve the problem, open a Support Request at http://helpdesk.mines.edu.
Mac OSX/macOS
Configuring a Dynamic IP Address Mac OSX/macOS
Note: This help sheet applies only to machines that will use a dynamic IP address (e.g., if you are using a laptop on the main campus, machines in residence halls, Mines Park, Greek houses, and most of the main campus). If you are connecting using a static IP address then you need to instead consult the Mac OSX Static TCP/IP connection instruction sheet.
This help sheet has been developed for students living in Mines Residences and faculty/staff members on the main campus who wish to set up a network connection on their Apple Machines running OSX versions Mavericks/Yosemite/El Capitan(10.9/10.10/10.11)or macOS Sierra (10.12). It assumes your computer already has a NIC (Network Interface Card) installed. This help sheet describes the basic steps necessary to establish communication between your Apple Machine and the Internet using TCP/IP (Transmission Control Protocol/Internet Protocol). As a general rule, unless specific instructions are included in this document, the default settings are fine.
- Go to the Apple Menu and select “System Preferences”
- Select “Network”. The image below should appear.
- On the left select the Network that you want to configure.
- Click the “Advanced” button.
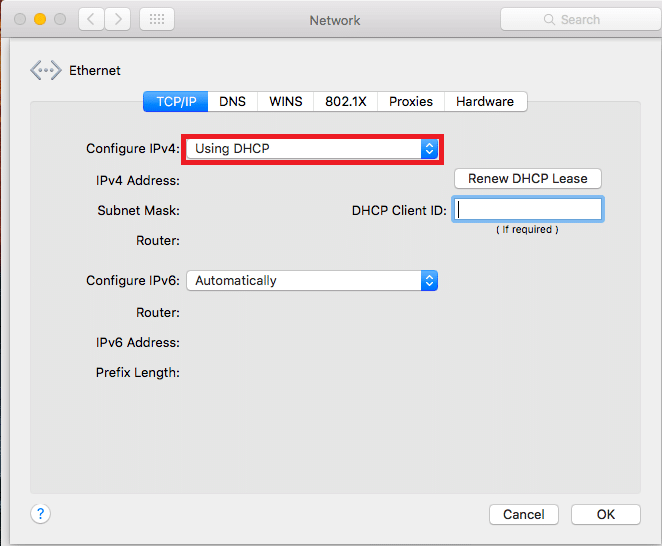
- Select the TCP/IP tab.
- Under the “Configure IPv4” dropdown you should have “Using DHCP” selected. If not please select that now.
- Select the DNS tab.
- Click the “OK” button to save these settings.
- You have now set a dyanmic IP to your Apple Machine!

Having completed all of the above steps, you should now be able to utilize software that requires a TCP/IP connection (e.g., telnet, ftp, web browsers, etc.)
Troubleshooting
If you have followed the instructions above and still cannot connect to the Mines network, try the following before seeking additional help:
- Some setting changes require a restart. Please restart your machine to see if this resets the adapter.
- If this does not resolve the problem, open a Support Request at http://helpdesk.mines.edu.
Static IP Addressing
Windows 7/8.1/10
Configuring a Static IP Address Windows 7 and 8.1 and 10
Note: This help sheet applies only to machines that will use a static IP address. If you are connecting using a dynamic IP address (e.g., if you are using a laptop on the main campus, machines in residence halls, Mines Park, Greek houses, or most of the main campus) then you need to instead consult the Windows 7 DHCP connection instruction sheet.
This help sheet has been developed for faculty/staff members on the main campus who wish to set up a network connection on their PC running Windows 7/8.1/10. It describes the basic steps necessary to establish communication between your PC and the Internet using TCP/IP (Transmission Control Protocol/Internet Protocol). It assumes your computer already has a NIC (Network Interface Card) installed and that you have already been given a static IP address. If you do not have a static IP address, one can be requested here https://helpcenter.mines.edu/TDClient/Requests/ServiceDet?ID=31197. You will not need many of the network options and settings available to you through Windows 7/8.1/10. As a general rule, unless specific instructions are included in this document, Windows 7/8.1/10 default settings are fine.
- From the Start button in Windows 7 and 10 or the search menu in Windows 8.1 complete the following steps: type in “Control Panel” and hit enter. –> select “Network and Sharing Center” –> select “Change adapter settings”.
- Select “Local Area Connection” then Right click and choose “Properties” from.
- Select “Internet Protocol Version 4 (TCP/IPv4), be sure it’s checkbox is check marked.
- Click the Properties button.
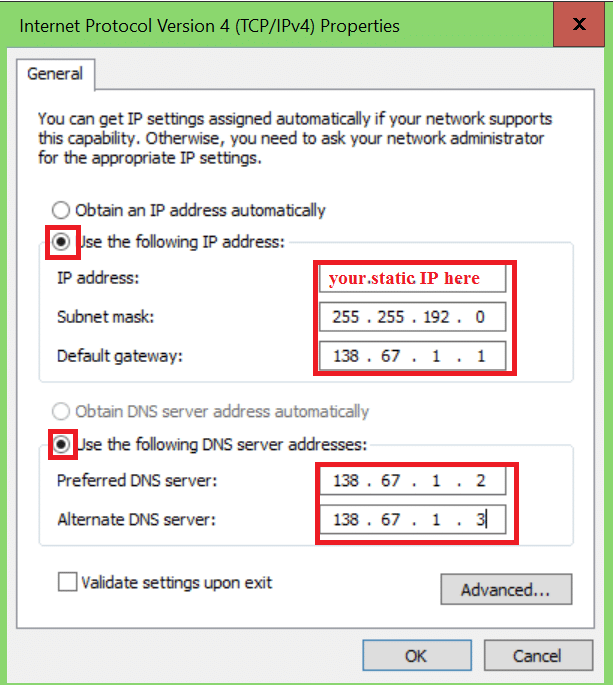
- Select option “Use the following IP address”.
- In the “IP address:” field enter the static IP address you received.
- In the “Subnet Mask:” field enter “255.255.192.0” (not the quote marks.)
- In the “Default Gateway:” field enter “138.67.1.1” (not the quote marks.)
- Select option “Use the following DNS server addresses”
- In the “Preferred DNS server:” field enter “138.67.1.2” (not the quote marks.)
- In the “Alternate DSN server:” field enter “138.67.1.3” (not the quote marks.)
- Click the Advanced button, then select the DNS tab.
- In the “DNS suffix for this connection:” field enter “mines.edu” (not the quote marks), then Click Ok.
- Click Ok again, then Click Close.
Having completed all of the above steps, you should now be able to utilize software that requires a TCP/IP connection (e.g., telnet, ftp, web browsers, etc.)
Troubleshooting
If you have followed the instructions above and still cannot connect to the Mines network, try the following before seeking additional help:
- Ensure that your network cable is plugged in to your network card and the correct jack on the wall.
- Most network cards will default to automatically detect the network speed. Sometimes, this doesn’t work, and you need to manually set the speed. In the “Local Area Connection Properties” window, Click the “Configure” button. Under the “Advanced” tab, you can change your NIC settings. Scroll down to and select “Speed and Duplex”, then manually set the speed to “100Mbps Full Duplex” in the drop down menu on the right. 100Mbps Full Duplex will work almost everywhere on campus. If that doesn’t solve the problem, change the speed to “10Mbps Half Duplex”. 10MbpsHalf will work everywhere on campus.
- Return to where you selected the “Local Area Connection”. Here to reset the adapter you may right click and select “Disable” then right click again after a few second to “Enable” the device again. If the device was aleady disable please re-enable it.
- Some setting changes require a restart. Please restart your machine to see if this resets the adapter.
- If these steps do not resolve the problem, open a Support Request at http://helpdesk.mines.edu.
Mac OSX/macOS
Configuring a Static IP Address Mac OSX and macOS
Note: This help sheet applies only to machines that will use a dynamic IP address (e.g., if you are using a laptop on the main campus, machines in residence halls, Mines Park, Greek houses, and most of the main campus). If you are connecting using a static IP address then you need to instead consult the Mac OSX Static TCP/IP connection instruction sheet.
This help sheet has been developed for students living in Mines Residences and faculty/staff members on the main campus who wish to set up a network connection on their Apple Machines running OSX versions Mavericks/Yosemite/El Capitan(10.9/10.10/10.11)or macOS Sierra (10.12). It assumes your computer already has a NIC (Network Interface Card) installed. You will also need an assigned static IP address. If you do not have a static IP address, one can be requested here: https://helpcenter.mines.edu/TDClient/Requests/ServiceDet?ID=31197 This help sheet describes the basic steps necessary to establish communication between your Apple Machine and the Internet using TCP/IP (Transmission Control Protocol/Internet Protocol). As a general rule, unless specific instructions are included in this document, the default settings are fine.
- Go to the Apple Menu and select “System Preferences”
- Select “Network”. The image below should appear.
- On the left select the Network that you want to configure.
- Click the “Advanced” button.
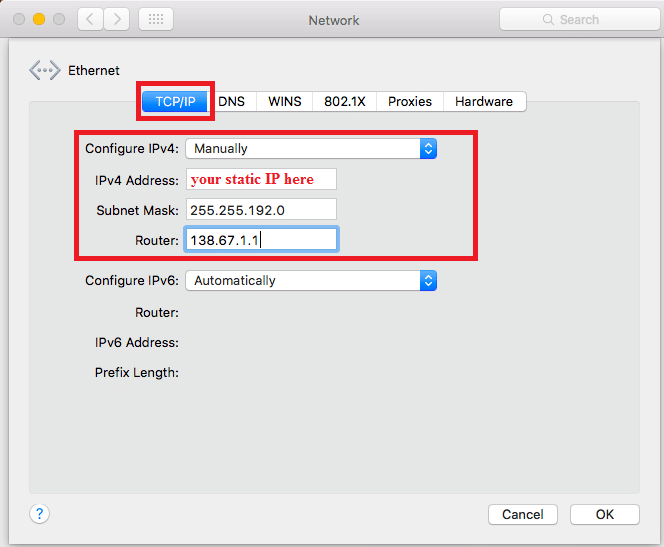
- Select the TCP/IP tab.
- Under the “Configure IPv4” dropdown you should have “Manually” selected. If not please select that now.
- Under the “IPv4 Address category” enter in your assigned static IP address.
- Under the “Subnet Mask category” enter in or make sure it is “255.255.192.0”.
- Under the “Router category” enter in “138.67.1.1”.
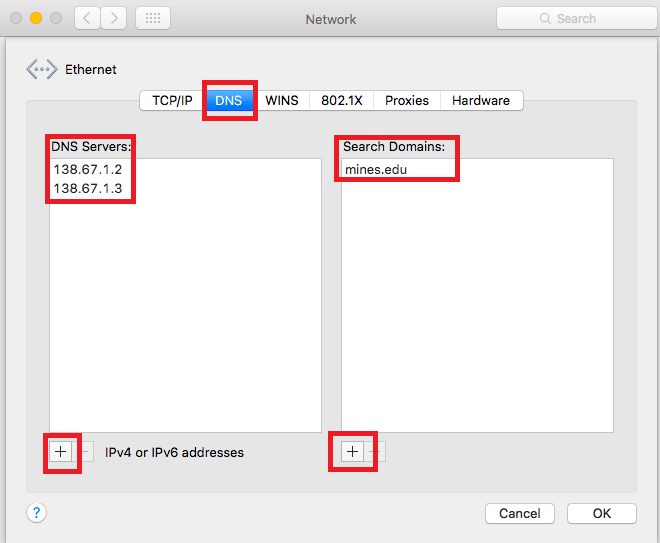
- Select the DNS tab.
- Under the “DNS Servers” list select the “+” and add the following two numbers separately: “138.67.1.2” and “138.67.1.3”.
- Under the “Search Domains” list select the “+” and add “mines.edu”
- Click the “OK” button to save these settings.
- You have now set a static IP to your Apple Machine!
Having completed all of the above steps, you should now be able to utilize software that requires a TCP/IP connection (e.g., telnet, ftp, web browsers, etc.)
Troubleshooting
If you have followed the instructions above and still cannot connect to the Mines network, try the following before seeking additional help:
- Some setting changes require a restart. Please restart your machine to see if this resets the adapter.
- If this does not resolve the problem, open a Support Request at http://helpdesk.mines.edu.